If you have SSH, Shell access the following commands should be able to be run from the command line to reset all your files and directories back to the server defaults of 755 and 644.
Change directory in to the top directory (" / ") of your Joomla! installation, then run these;
find . -type f -exec chmod 644 {} \;
find . -type d -exec chmod 755 {} \;
If you only have FTP access, this can be a very time consuming job, however, unless you changed more directories during the installation that was requested, you should only need to reset about 10 directories and the configuration.php file.
Keep in mind that to install any extensions or templates after the actual Joomla! installation you may need to elevate the default permissions again on the appropriate directories just for the installation period, you may then demote them again after the add-on is installed.
If you decide to use "cache" the cache directory will need to be "Writable" to the Web-Server user to allow it to write its temporary files.
Once you have completed the installation, next thing to do is read Ron Liskey's "Joomla! Admins Security Checklist". I am sure you will find much of the security information that you will need in this post and the Security Forum.
Joomla! Admins Security Checklist
http://forum.joomla.org/index.php/topic,81058.0.html
Monday, May 18, 2009
Wednesday, May 13, 2009
How do I embed picasaweb albums on my website?
Here is how to embed picasaweb on your website:
http://googlified.com/embedding-picasa-web-albums-on-your-site/
/*
//requestVars start
/*
* @author Jesse Berman
* @copyright 2008-01-31
* @version 1.0
* @license http://www.gnu.org/copyleft/lesser.html
*/
/*
* Portions by Dieter Raber
* copyright 2004-12-27
*/
/* pwa.js: a drop-in JavaScript utility that displays galleries from picasaweb.google.com in your website */
/* NOTE: This version hides all the link-backs to Picasa */
/* This JavaScript file, when called from a webpage, will load all the thumbnail images of all the galleries
in a user's Picasa Web Albums account into an HTML table that's 4 rows wide. Clicking on any of the
galleries will display thumbnails of all the photos in that gallery, and clicking on any of those thumbnails
will display the photo.
To call this file from your own webpage, use the following syntax:
Make sure you change YourPicasawebUsername to your actual Picasaweb username. For more information about
Picasa, check out picasaweb.google.com. Also, www.yoursite.com should point to your actual site name, and
the location of the pwa.js file. The script looks for the images back.jpg, next.jpg, and home.jpg, in the
same directory as pwa.js, to create the navigation arrows. Please make sure those exist! I'm providing
samples in the SourceForce repository, but feel free to substitute your own.
Note: "Photosize" is the size of the image to be displayed when viewing single images. I like 800. :-)
Note: "columns" is the number of columns of photos to be displayed on your site in the gallery and album views.
You may omit either of these values; if you do, the default settings are 800 for photosize and 4 for columns.
*/
function readGet(){var _GET = new Array();var uriStr = window.location.href.replace(/&/g, '&');var paraArr, paraSplit;if(uriStr.indexOf('?') > -1){var uriArr = uriStr.split('?');var paraStr = uriArr[1];}else{return _GET;}if(paraStr.indexOf('&') > -1){paraArr = paraStr.split('&');}else{paraArr = new Array(paraStr);}for(var i = 0; i < paraArr.length; i++){paraArr[i] = paraArr[i].indexOf('=') > -1 ? paraArr[i] : paraArr[i] + '=';paraSplit = paraArr[i].split('=');_GET[paraSplit[0]] = decodeURI(paraSplit[1].replace(/\+/g, ' '));}return _GET;}var _GET = readGet();
//requestVars end
function resize(which, max) {
// not used anymore! was scaling photos after they were loaded. using browser-native inline scaling instead,
// until google fixes their image size request to work with any imgmax, rather than just 800 :-(
var elem = document.getElementById(which);
if (elem == undefined || elem == null) return false;
if (max == undefined) max = 658;
if (elem.width > elem.height) {
if (elem.width > max) elem.width = max;
} else {
if (elem.height > max) elem.height = max;
}
}
//$Update: May 10, 2007$
function $(a){document.write(a);}
var photosize;
if(!photosize){photosize = 800;}
var columns;
if(!columns || isNaN(columns) || columns < 1) {columns = 4;}
//Global variables
var photolist = new Array(); //this is used globally to store the entire list of photos in a given album, rather than pass the list around in a URL (which was getting rediculously long as a result)
var album_name = ""; //this is used globally to store the album name, so we don't have to pass it around in the URL anymore either.
var my_numpics = ""; //this is used globally to store the number of items in a particular album, so we don't have to pass it around in the URL anymore either.
var prev = ""; //used in the navigation arrows when viewing a single item
var next = "";//used in the navigation arrows when viewing a single item
function picasaweb(j){ //returns the list of all albums for the user
$("
");
$("
");
}
function getphotolist(j){
// This function is called just before displaying an item; it returns info about the item's current state within its parent
// album, such as the name of the album it's in, the index of the photo in that album, and the IDs of the previous and next
// photos in that album (so we can link to them using navigation arrows). This way we don't have to pass state information
// around in the URL, which was resulting in hellishly long URLs (sometimes causing "URI too long" errors on some servers).
// Get the number of pictures in the album. Added 7/18/2007.
my_numpics = j.feed.openSearch$totalResults.$t;
// Also get the name of the album, so we don't have to pass that around either. Added 7/18/2007.
album_name = j.feed.title.$t;
for(i=0;i
// also stored in an array (photoids) for navigation in the photo view (passed via the URL)
var id_begin = j.feed.entry[i].id.$t.indexOf('photoid/')+8;
var id_end = j.feed.entry[i].id.$t.indexOf('?');
var id_base = j.feed.entry[i].id.$t.slice(id_begin, id_end);
photolist[i]=id_base;
// now get previous and next photos relative to the photo we're currently viewing
if (i>0)
{
var prev_begin = j.feed.entry[i-1].id.$t.indexOf('photoid/')+8;
var prev_end = j.feed.entry[i-1].id.$t.indexOf('?');
prev = j.feed.entry[i-1].id.$t.slice(id_begin, id_end);
}
if (i
var next_begin = j.feed.entry[i+1].id.$t.indexOf('photoid/')+8;
var next_end = j.feed.entry[i+1].id.$t.indexOf('?');
next = j.feed.entry[i+1].id.$t.slice(id_begin, id_end);
}
}
}
function albums(j){ //returns all photos in a specific album
//get the number of photos in the album
var np = j.feed.openSearch$totalResults.$t;
var item_plural = "s";
if (np == "1") { item_plural = ""; }
var album_begin = j.feed.entry[0].summary.$t.indexOf('href="')+6;
var album_end = j.feed.entry[0].summary.$t.indexOf('/photo#');
var album_link = j.feed.entry[0].summary.$t.slice(album_begin, album_end);
var photoids = new Array();
$("
");
$("
");
}
function photo(j){//returns exactly one photo
var album_begin = j.entry.summary.$t.indexOf('href="')+6;
var album_end = j.entry.summary.$t.indexOf('/photo#');
var album_link = j.entry.summary.$t.slice(album_begin, album_end);
var img_title = j.entry.title.$t;
//get the dimensions of the photo we're grabbing; if it's smaller than our max width, there's no need to scale it up.
var img_width = j.entry.media$group.media$content[0].width;
var img_height = j.entry.media$group.media$content[0].height;
var img_base = j.entry.media$group.media$content[0].url;
// is this a video? If so, we will display that in the breadcrumbs below.
var is_video = 0;
if (j.entry.media$group.media$content.length > 1)
{
//$('This is a '+j.entry.media$group.media$content[1].medium+'.
');
if (j.entry.media$group.media$content[1].medium == "video")
{
is_video = 1;
}
}
var photo_begin = j.entry.summary.$t.indexOf('href="')+6;
var photo_end = j.entry.summary.$t.indexOf('">
var photo_id = _GET['photoid'];
//album name is now taken from the global variable instead. 7/18/2007
//
//var album_name_begin = j.entry.summary.$t.indexOf(username)+username.length+1;
//var album_name_end = j.entry.summary.$t.indexOf('/photo#');
//var album_name = j.entry.summary.$t.slice(album_name_begin, album_name_end);
var album_id = _GET['albumid'];
var my_next = next;
var my_prev = prev;
var photo_array = photolist;
//var my_numpics = _GET['np'];
//instead, we now get this through the global variable my_numpics. 7/18/2007
//$("photo ids: "+_GET['photoids']+".
");
//$("photolist: "+photo_array+".
");
//var my_galleryname = _GET['galleryname'];
//var my_fixed_galleryname = my_galleryname.slice(1, my_galleryname.length-1);
var my_galleryname = album_name;
var my_fixed_galleryname = album_name;
var album_base_path = window.location.protocol + "//" + window.location.hostname+window.location.pathname +"?albumid="+ _GET['albumid'];
// Get the filename for display in the breadcrumbs
var LastSlash = 0;
var img_filename = img_title;
for(i=0;i
{
LastSlash = i;
}
}
if (LastSlash != 0)
{
img_filename = img_base.slice(LastSlash+1, img_base.length);
}
// replace some commonly-used URL characters like %20
img_filename = img_filename.replace("%20"," ");
img_filename = img_filename.replace("%22","\"");
img_filename = img_filename.replace("%27","\'");
//find preceding two and following two pictures in the array; used for the navigation arrows.
//the arrows are already linked to the previous and next pics, which were passed in with the URL.
//however, we need the ones that are two behind and two ahead so that we can pass that info along when we link to another photo.
//
//NOTE: as of 7/16/2007, the photo array is taken from global photolist (loaded in the getphotolist function) rather than from the URL.
//This has eliminated the need for really long URLs, which were hitting up against the URL length limit in some extreme cases.
for(i=0;i
{
var p1 = photo_array[i-1]; //ID of the picture one behind this one; if null, we're at the beginning of the album
var current_index = i + 1; //this is the count of the current photo
var n1 = photo_array[i+1]; //ID of the picture one ahead of this one; if null, we're at the end of the album
}
}
//these will be passed along if we move to the next or previous photo - removed the gallery name 7/18/2007
//var prev = album_base_path + "&photoid=" + p1 + "&np=" + my_numpics + "&galleryname=" + my_galleryname.replace("'","%27") + "&prev="+p2+ "&next="+photo_id; //+"&photoids="+photo_array;
//var next = album_base_path + "&photoid=" + n1 + "&np=" + my_numpics + "&galleryname=" + my_galleryname.replace("'","%27") + "&prev="+photo_id+ "&next="+n2; //+"&photoids="+photo_array;
var prev = album_base_path + "&photoid=" + p1; //+"&photoids="+photo_array;
var next = album_base_path + "&photoid=" + n1; //+"&photoids="+photo_array;
//Display the breadcrumbs
var my_item_plural = "";
if (my_numpics != 1)
{
my_item_plural = "s";
}
var item_label = "picture";
var item_label_caps = "Picture";
if (is_video == 1) //if it's a video, don't say it's a picture, say it's an "item" instead
{
item_label = "item";
item_label_caps = "Item";
}
//if (photo_array.length == 1) { var current_index_text = "Total of " + my_numpics + " " + item_label + my_item_plural; } else { var current_index_text = item_label_caps + " " + current_index + " of " + my_numpics; }
var current_index_text = item_label_caps + " " + current_index + " of " + my_numpics;
if (is_video == 1) { current_index_text = current_index_text + " [VIDEO]"; } //show in the breadcrumbs that the item is a video
$("
");
if (p1 == null) //we're at the first picture in the album; going back takes us to the album index
{ var prev = album_base_path }
if (n1 == null) //we're at the last picture in the album; going forward takes us to the album index
{ var next = album_base_path }
//the navigation panel: back, home, and next.
$("
");
var max_width = 658; //max width for our photos
var display_width = max_width;
if (img_width < display_width)
{ display_width = img_width; } //don't scale up photos that are narrower than our max width; disable this to set all photos to max width
//at long last, display the image and its description. photos larger than max_width are scaled down; smaller ones are left alone
$("
$("
//now we will trap left and right arrow keys so we can scroll through the photos with a single keypress ;-) JMB 7/5/2007
$('');
// an attempt at resampling the photo, rather than relying on the browser's internal resize function. doesn't work, unfortunately.
//
//$(" //$("$ratio_orig = $width_orig/$height_orig; if ($width/$height > $ratio_orig) { $width = $height*$ratio_orig; } else { $height = $width/$ratio_orig; } ");
//$("$image_p = imagecreatetruecolor($width, $height); $image = imagecreatefromjpeg($filename); ");
//$("imagecopyresampled($image_p, $image, 0, 0, 0, 0, $width, $height, $width_orig, $height_orig); imagejpeg($image_p, null, 100); ?>");
}
if(_GET['photoid']&&_GET['albumid']){
$('');//get the list of photos in the album and put it in the global "photolist" array so we can properly display the navigation arrows; this eliminates the need for really long URLs :-) 7/16/2007
$('');//photo
}else if(_GET['albumid']&&!_GET['photoid']){
$('');//albums
}else{
$('');//picasaweb
}
//$Update: January 31, 2008$
*/
http://googlified.com/embedding-picasa-web-albums-on-your-site/
/*
//requestVars start
/*
* @author Jesse Berman
* @copyright 2008-01-31
* @version 1.0
* @license http://www.gnu.org/copyleft/lesser.html
*/
/*
* Portions by Dieter Raber
* copyright 2004-12-27
*/
/* pwa.js: a drop-in JavaScript utility that displays galleries from picasaweb.google.com in your website */
/* NOTE: This version hides all the link-backs to Picasa */
/* This JavaScript file, when called from a webpage, will load all the thumbnail images of all the galleries
in a user's Picasa Web Albums account into an HTML table that's 4 rows wide. Clicking on any of the
galleries will display thumbnails of all the photos in that gallery, and clicking on any of those thumbnails
will display the photo.
To call this file from your own webpage, use the following syntax:
Make sure you change YourPicasawebUsername to your actual Picasaweb username. For more information about
Picasa, check out picasaweb.google.com. Also, www.yoursite.com should point to your actual site name, and
the location of the pwa.js file. The script looks for the images back.jpg, next.jpg, and home.jpg, in the
same directory as pwa.js, to create the navigation arrows. Please make sure those exist! I'm providing
samples in the SourceForce repository, but feel free to substitute your own.
Note: "Photosize" is the size of the image to be displayed when viewing single images. I like 800. :-)
Note: "columns" is the number of columns of photos to be displayed on your site in the gallery and album views.
You may omit either of these values; if you do, the default settings are 800 for photosize and 4 for columns.
*/
function readGet(){var _GET = new Array();var uriStr = window.location.href.replace(/&/g, '&');var paraArr, paraSplit;if(uriStr.indexOf('?') > -1){var uriArr = uriStr.split('?');var paraStr = uriArr[1];}else{return _GET;}if(paraStr.indexOf('&') > -1){paraArr = paraStr.split('&');}else{paraArr = new Array(paraStr);}for(var i = 0; i < paraArr.length; i++){paraArr[i] = paraArr[i].indexOf('=') > -1 ? paraArr[i] : paraArr[i] + '=';paraSplit = paraArr[i].split('=');_GET[paraSplit[0]] = decodeURI(paraSplit[1].replace(/\+/g, ' '));}return _GET;}var _GET = readGet();
//requestVars end
function resize(which, max) {
// not used anymore! was scaling photos after they were loaded. using browser-native inline scaling instead,
// until google fixes their image size request to work with any imgmax, rather than just 800 :-(
var elem = document.getElementById(which);
if (elem == undefined || elem == null) return false;
if (max == undefined) max = 658;
if (elem.width > elem.height) {
if (elem.width > max) elem.width = max;
} else {
if (elem.height > max) elem.height = max;
}
}
//$Update: May 10, 2007$
function $(a){document.write(a);}
var photosize;
if(!photosize){photosize = 800;}
var columns;
if(!columns || isNaN(columns) || columns < 1) {columns = 4;}
//Global variables
var photolist = new Array(); //this is used globally to store the entire list of photos in a given album, rather than pass the list around in a URL (which was getting rediculously long as a result)
var album_name = ""; //this is used globally to store the album name, so we don't have to pass it around in the URL anymore either.
var my_numpics = ""; //this is used globally to store the number of items in a particular album, so we don't have to pass it around in the URL anymore either.
var prev = ""; //used in the navigation arrows when viewing a single item
var next = "";//used in the navigation arrows when viewing a single item
function picasaweb(j){ //returns the list of all albums for the user
$("
Gallery Home
");
$("
$(" | ");
|
}
function getphotolist(j){
// This function is called just before displaying an item; it returns info about the item's current state within its parent
// album, such as the name of the album it's in, the index of the photo in that album, and the IDs of the previous and next
// photos in that album (so we can link to them using navigation arrows). This way we don't have to pass state information
// around in the URL, which was resulting in hellishly long URLs (sometimes causing "URI too long" errors on some servers).
// Get the number of pictures in the album. Added 7/18/2007.
my_numpics = j.feed.openSearch$totalResults.$t;
// Also get the name of the album, so we don't have to pass that around either. Added 7/18/2007.
album_name = j.feed.title.$t;
for(i=0;i
// also stored in an array (photoids) for navigation in the photo view (passed via the URL)
var id_begin = j.feed.entry[i].id.$t.indexOf('photoid/')+8;
var id_end = j.feed.entry[i].id.$t.indexOf('?');
var id_base = j.feed.entry[i].id.$t.slice(id_begin, id_end);
photolist[i]=id_base;
// now get previous and next photos relative to the photo we're currently viewing
if (i>0)
{
var prev_begin = j.feed.entry[i-1].id.$t.indexOf('photoid/')+8;
var prev_end = j.feed.entry[i-1].id.$t.indexOf('?');
prev = j.feed.entry[i-1].id.$t.slice(id_begin, id_end);
}
if (i
var next_begin = j.feed.entry[i+1].id.$t.indexOf('photoid/')+8;
var next_end = j.feed.entry[i+1].id.$t.indexOf('?');
next = j.feed.entry[i+1].id.$t.slice(id_begin, id_end);
}
}
}
function albums(j){ //returns all photos in a specific album
//get the number of photos in the album
var np = j.feed.openSearch$totalResults.$t;
var item_plural = "s";
if (np == "1") { item_plural = ""; }
var album_begin = j.feed.entry[0].summary.$t.indexOf('href="')+6;
var album_end = j.feed.entry[0].summary.$t.indexOf('/photo#');
var album_link = j.feed.entry[0].summary.$t.slice(album_begin, album_end);
var photoids = new Array();
$("
Gallery Home > "+ j.feed.title.$t +" ["+np+" item"+item_plural+"]
");
$("
//$(" $(" | ");
}
function photo(j){//returns exactly one photo
var album_begin = j.entry.summary.$t.indexOf('href="')+6;
var album_end = j.entry.summary.$t.indexOf('/photo#');
var album_link = j.entry.summary.$t.slice(album_begin, album_end);
var img_title = j.entry.title.$t;
//get the dimensions of the photo we're grabbing; if it's smaller than our max width, there's no need to scale it up.
var img_width = j.entry.media$group.media$content[0].width;
var img_height = j.entry.media$group.media$content[0].height;
var img_base = j.entry.media$group.media$content[0].url;
// is this a video? If so, we will display that in the breadcrumbs below.
var is_video = 0;
if (j.entry.media$group.media$content.length > 1)
{
//$('This is a '+j.entry.media$group.media$content[1].medium+'.
');
if (j.entry.media$group.media$content[1].medium == "video")
{
is_video = 1;
}
}
var photo_begin = j.entry.summary.$t.indexOf('href="')+6;
var photo_end = j.entry.summary.$t.indexOf('">
var photo_id = _GET['photoid'];
//album name is now taken from the global variable instead. 7/18/2007
//
//var album_name_begin = j.entry.summary.$t.indexOf(username)+username.length+1;
//var album_name_end = j.entry.summary.$t.indexOf('/photo#');
//var album_name = j.entry.summary.$t.slice(album_name_begin, album_name_end);
var album_id = _GET['albumid'];
var my_next = next;
var my_prev = prev;
var photo_array = photolist;
//var my_numpics = _GET['np'];
//instead, we now get this through the global variable my_numpics. 7/18/2007
//$("photo ids: "+_GET['photoids']+".
");
//$("photolist: "+photo_array+".
");
//var my_galleryname = _GET['galleryname'];
//var my_fixed_galleryname = my_galleryname.slice(1, my_galleryname.length-1);
var my_galleryname = album_name;
var my_fixed_galleryname = album_name;
var album_base_path = window.location.protocol + "//" + window.location.hostname+window.location.pathname +"?albumid="+ _GET['albumid'];
// Get the filename for display in the breadcrumbs
var LastSlash = 0;
var img_filename = img_title;
for(i=0;i
{
LastSlash = i;
}
}
if (LastSlash != 0)
{
img_filename = img_base.slice(LastSlash+1, img_base.length);
}
// replace some commonly-used URL characters like %20
img_filename = img_filename.replace("%20"," ");
img_filename = img_filename.replace("%22","\"");
img_filename = img_filename.replace("%27","\'");
//find preceding two and following two pictures in the array; used for the navigation arrows.
//the arrows are already linked to the previous and next pics, which were passed in with the URL.
//however, we need the ones that are two behind and two ahead so that we can pass that info along when we link to another photo.
//
//NOTE: as of 7/16/2007, the photo array is taken from global photolist (loaded in the getphotolist function) rather than from the URL.
//This has eliminated the need for really long URLs, which were hitting up against the URL length limit in some extreme cases.
for(i=0;i
{
var p1 = photo_array[i-1]; //ID of the picture one behind this one; if null, we're at the beginning of the album
var current_index = i + 1; //this is the count of the current photo
var n1 = photo_array[i+1]; //ID of the picture one ahead of this one; if null, we're at the end of the album
}
}
//these will be passed along if we move to the next or previous photo - removed the gallery name 7/18/2007
//var prev = album_base_path + "&photoid=" + p1 + "&np=" + my_numpics + "&galleryname=" + my_galleryname.replace("'","%27") + "&prev="+p2+ "&next="+photo_id; //+"&photoids="+photo_array;
//var next = album_base_path + "&photoid=" + n1 + "&np=" + my_numpics + "&galleryname=" + my_galleryname.replace("'","%27") + "&prev="+photo_id+ "&next="+n2; //+"&photoids="+photo_array;
var prev = album_base_path + "&photoid=" + p1; //+"&photoids="+photo_array;
var next = album_base_path + "&photoid=" + n1; //+"&photoids="+photo_array;
//Display the breadcrumbs
var my_item_plural = "";
if (my_numpics != 1)
{
my_item_plural = "s";
}
var item_label = "picture";
var item_label_caps = "Picture";
if (is_video == 1) //if it's a video, don't say it's a picture, say it's an "item" instead
{
item_label = "item";
item_label_caps = "Item";
}
//if (photo_array.length == 1) { var current_index_text = "Total of " + my_numpics + " " + item_label + my_item_plural; } else { var current_index_text = item_label_caps + " " + current_index + " of " + my_numpics; }
var current_index_text = item_label_caps + " " + current_index + " of " + my_numpics;
if (is_video == 1) { current_index_text = current_index_text + " [VIDEO]"; } //show in the breadcrumbs that the item is a video
$("
Gallery Home > " + my_fixed_galleryname + " > " + current_index_text + "
");
if (p1 == null) //we're at the first picture in the album; going back takes us to the album index
{ var prev = album_base_path }
if (n1 == null) //we're at the last picture in the album; going forward takes us to the album index
{ var next = album_base_path }
//the navigation panel: back, home, and next.
$("
 | "); } |  | ");
 | "); }
");
var max_width = 658; //max width for our photos
var display_width = max_width;
if (img_width < display_width)
{ display_width = img_width; } //don't scale up photos that are narrower than our max width; disable this to set all photos to max width
//at long last, display the image and its description. photos larger than max_width are scaled down; smaller ones are left alone
$("
$("
"+j.entry.media$group.media$description.$t+"
//now we will trap left and right arrow keys so we can scroll through the photos with a single keypress ;-) JMB 7/5/2007
$('');
// an attempt at resampling the photo, rather than relying on the browser's internal resize function. doesn't work, unfortunately.
//
//$(" //$("$ratio_orig = $width_orig/$height_orig; if ($width/$height > $ratio_orig) { $width = $height*$ratio_orig; } else { $height = $width/$ratio_orig; } ");
//$("$image_p = imagecreatetruecolor($width, $height); $image = imagecreatefromjpeg($filename); ");
//$("imagecopyresampled($image_p, $image, 0, 0, 0, 0, $width, $height, $width_orig, $height_orig); imagejpeg($image_p, null, 100); ?>");
}
if(_GET['photoid']&&_GET['albumid']){
$('');//get the list of photos in the album and put it in the global "photolist" array so we can properly display the navigation arrows; this eliminates the need for really long URLs :-) 7/16/2007
$('');//photo
}else if(_GET['albumid']&&!_GET['photoid']){
$('');//albums
}else{
$('');//picasaweb
}
//$Update: January 31, 2008$
*/
Monday, May 04, 2009
MOSS 2007 Workflow for Visual Studio 2005
To get the MOSS 2007 templates into Visual Studio 2005, you need to:
1. Install Windows for Workflow 3.0 or better (actually: Windows Workflow Foundation version 3.0.4203.2 or better). This is trouble because if you had previously installed the .net 3.0 redistributable package, it is not good enough, you need the full .net 3.0 foundation package here: The Full .Net Framework 3.0 installer package download URL : http://go.microsoft.com/fwlink/?LinkId=70848
2. Install Visual Studio 2005 Extensions for Windows Workflow Foundation (EN).exe
3. See Nick's article here: http://weblog.vb-tech.com/nick/archive/2006/09/04/1753.aspx
Thursday, March 19, 2009
MOSS AD Synch Issues Part 2
So I was having issues with the MOSS AD Synch of the user profile info into MOSS from Active Directory (email address, first and last name etc).
The issue is this, the import process into the Shared Services database from Active Directory was working and scheduled and fine. A full import was done and all users came in. Then, I scheduled hourly incremental import (runs like 10-20seconds max on a 1200 user AD). Fine.
But, the individual Sharepoint sites each have their own Content Database (SQL db) right? What was happening is the UserProfile table (where all this info is stored) was not being updated in the Content DBs but WAS BEING UPDATED IN THE SSP DB. Turns out their is a Timer job called ProfileSynch that was failing. It had no credentials to login to the SSP_DB as the specified user (EGSEG-ROSMOS01\sa_MOSS2007). So, now I am off now to fix that problem (and hope this works)! Why can't MOSS be less complicated? UGH - the NCAA games are starting soon.. GO TIGERS!!! Memphis, Lousiville, UNC, and Syracuse are my Final 4 with Memphis over UNC in the championship!
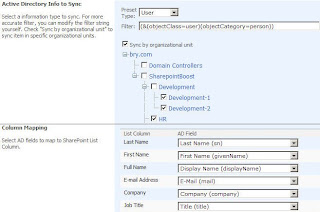
MOSS AD Synch Issues Part 1
1. MOSS provides user profile from AD sync to user profile list while WSS doesn't.
2. MOSS support Active Directory sync to user profile other than lists, and computer information in AD can not be synced.
3. If you want to get MULTIPLE AD information in AD sync to one list, it is also impossible using MOSS provided user profile sync.
Here is a custom tool from sharepointboost.com (for purchase?) that tries to address the shortcomings:

Friday, March 06, 2009
MOSS 2007 Pages show up for system account but not regular users (i.e. Publishing Pages)!
So I ran into a problem (should have been rather obvious but just learning sharepoint designer on my own here). I made changes to several master pages and page layouts in Sharepoint designer and by hand coding html and they were showing up perfectly for me and the Sharepoint System Account in the web browser when accessing the site. So cool, I thought my job was done.
But NOPE - Because ... somehow for regular MOSS users and guests, they were not showing up. AARRGH MSFT again! Here we go...
I first thought it was a permissions thing. But then I looked closer in Sharepoint Designer, and saw a bunch of little green checkmarks next to each file I had changed plus a bunch I did not change. So I right clicked and said Check In. Well then it asks you are you checking in a minor version or publishing a major version. I say Publish Major Version, put a short comment. Then it says this type of change has to be approved, do you wish to approve/review now? I say yes, then it opens up web browser to the content approval page within Sharepoint for the particular site I am working on. In there, I select the pending files to approve and Click Approve.
VOILA - then all users can see my beautiful new changes and Marketing is happy! Plus is Friday 2:30PM and 60 degrees out after a hard long winter in CHI TOWN so I am happy to be able to leave the office a bit early today!
MOSS 2007 Master Pages - how to use, what are they?
Here is a link to a Microsoft MVP Sharepoint Master Page and Layout specialist's blog. Heather Solomon is very good at this stuff.
This article in particular discusses what master pages are and how to use them in MOSS 2007 at a conceptual level:
http://www.heathersolomon.com/blog/articles/MOSS07DesignComponents.aspx
Enjoy!!
This article in particular discusses what master pages are and how to use them in MOSS 2007 at a conceptual level:
http://www.heathersolomon.com/blog/articles/MOSS07DesignComponents.aspx
Enjoy!!
MOSS 2007 Create New Web Application/Database for later move to another MOSS Server
Here is how to create a new web application and database for a new site in MOSS 2007. This will allow for ease of moving the site and database in the future to a separate physical MOSS server. This came up yesterday at work.
TO RESTORE ONTO NEW SERVER/MOSS INSTANCE
- Go into Central Administration on the existing MOSS instance. You must sign in as a farm administrator, I do not think a site collection administrator will cut it for this task. The way to check is if you see the Create or Extend Web application Link in the step below, you are good. It should be the top most link under Sharepoint Web Application Management on the Application Management page of Central Administration. It will be just above Remove SharePoint from IIS Web Site. NOTE: If you can not see this, simply type in http://servername:centraladminport/_admin/extendvs.aspx
- Click on Application Management, Create or extend Web Appplication. Click create a new web application. This will create a new IIS website and a new content database for the new site. This aids in moving it to other physical or logical MOSS instances later on.
- Fill in the information accordingly for the new Web Application page.
- You can use an existing IIS site, but not for this exercise, instead create a new IIS site, give it a port number not already in use (MOSS will default to one for you or you can change it).
- Give the site a description describing its purpose - make it a good description that includes sharepoint and the port number and the sites purpose because this is what will show up in IIS for example later and it is easy to move if you have a lot of sites to manage.
- Specify the path for the website files - or take the default of c:\inetpub\wwwroot\wss\VirtualDirectories\...
- Take the default NTLM Allow Anonymous No and Use SSL No (unless it is externally facing or you have special security requirements. NOTE: Excel Services sites work better with Kerberos not NTLM.
- Choose the load balanced URL for the site or take the default
- Application Pool - here is where you can use an exsiting one on the existing MOSS instance or create a new one, it does not matter. When you move this to another server/MOSS instance later, it will use one on that server/MOSS instance anyway not this one.
- Restart IIS Manually (the default) is ok - 99 times out of 100 you will not have to even restart IIS after creating this new site anyway. I don't knwo why MSFT puts this in here.
- Specify Database Server and Name - it is a good idea to name the database WSS_Content_
like you named the website above (minus the port information of course) - Select your database authentication method, Windows authentication is preferred.
- Select which server in your MOSS environment is the Search Server for the new site.
- Click OK and MOSS will try to create the new IIS website and new SQL Server database for you. If you look in those apps after it returns (with successfully created) you will see the new website and new database. Be sure to add those to your backup strategy if it requires you to update which database and site files needs backup.
- If you get errors, read the error message and try to troubleshoot it, it may mean there is a security/authority error or something else. Good luck!
- Now create a new site collection in Central Administration -> Application Management then you can begin creating sites on your new MOSS Web Application and start to fill up your new database and IIS Web Application with sites and subsites!
To move the site and database onto a new box or instance is pretty straightforward. Often you have to do this due to performance, disk, or logical split/upper management decision reasons.
- On the new server, create a new web application similar to the above process.
- Create a new site collection using the blank site template
- use the stsadmin -backup command on the old server. This makes a .dat file.
- use the stsadmin -restore command on the new server on the .dat file
- Everything should work fine.
MOSS 2007 Physical and Applicaiton Architecture Tiers
MOSS 2007 follows a 3 Tier structure
1. Web Server Tier (IIS) - can be network load balanced
2. Application Server Tier
- Contains Shared Service Provider (SSP) which handles:
- Search, Index, Audience, User Profiles, My Sites, BDC, Excel Services (Last 2 are Enterprise Edition only). Typically you woudl put My Sites on its own server, Excel Services/BDC on its own or the same server, and Audience/User Profiles on its own or the same server, and Search+Index on its own or the same server (if you had 4 servers in this tier for example).
- NOTE: Any service can reside on any mid tier server. Also, the index server is limited to 1 per SSP, but all the other services have no limit as to how many servers can provide/service/host them
3. Database Tier - consist of standard SQL Server 2005 or SQL Server 2005 Cluster of servers
Thursday, March 05, 2009
Using the SCP command (Linux)
20.3.2. Using the scp Command
The scp command can be used to transfer files between machines over a secure, encrypted connection. It is similar to rcp.
The general syntax to transfer a local file to a remote system is as follows:
scp username@tohostname: The /var/log/maillog. The /tmp/hostname-maillog. For the remote system, if you do not have a preceding /, the path will be relative to the home directory of username, typically /home/username/.
To transfer the local file shadowman to the home directory of your account on penguin.example.net, type the following at a shell prompt (replace username with your username):
scp shadowman username@penguin.example.net:shadowman This will transfer the local file shadowman to /home/ on penguin.example.net. Alternately, you can leave off the final username/shadowmanshadowman in the scp command.
The general syntax to transfer a remote file to the local system is as follows:
scp username@tohostname: The
Multiple files can be specified as the source files. For example, to transfer the contents of the directory downloads/ to an existing directory called uploads/ on the remote machine penguin.example.net, type the following at a shell prompt:
scp downloads/* username@penguin.example.net:uploadsPhotoshop make buttons with text labels
Use the Text Selet tool (It has the letter A in the toolbar) then drag your move over the text or click on the text layer with the mouse point.
--j
Can you sendme the wec buttons and instructions how I can select the text on the button and modify it.
There are 4 wec buttons I think. Then they also toggle off to different color. So 8 total.
I need to also make 8 but just with different text. Trying to learn photoshop
MOSS 2007 (Sharepoint) Architecture
Here is a good article explaining MOSS 2007 arch as well.
http://blogs.msdn.com/martinkearn/archive/2006/06/06/MOSS-Architecture-_2600_-Shared-Services.aspx
Microsoft Certification Tips
Travis here is what I did. To Become a MCP, just take one test(70-271).
To become a MCDST take these two tests 70-271 and 70-272 Go Here
http://www.microsoft.com/learning/mcp/mcdst/requirements.mspx
Then for a MCSA go here
http://www.microsoft.com/learning/mcp/mcsa/windows2003/default.mspx
You are supposed to take 4 exams, one of which is an elective BUT "As an alternative to choosing an elective exam listed in the preceding table, you can choose the following certifications or certification combinations." and that certification is an MCDST. Get it?
So if you are a MCDST FIRST then you only have to take 3 more tests Exam 70-270, Exam 70-290, Exam 70-291. I have the test questions for these 3.
Then if you want to become an MCSE you go here:
http://www.microsoft.com/learning/mcp/mcse/windows2003/default.mspx
And there are even more tests to take...(3 more maybe) BUT if you take the path in order of MCP-MCDST-MCSA-MCSE then you will have to take less tests because you have already taken some of them to fullfill the other certs. Then you will have ALL 4 certs...(I only have 3)
And now I am reading that EVERYTHING changes with 2008.. The new Cert is called an Microsoft Certified IT Professional (MCITP) and you can either become an MCITP: Server Administrator or an MCITP: Enterprise Administrator.
CRAZZZZZZZZZZZZZZZZZZZZZZYYYYYYYYYYYYY
By the way you can get the ANSWERS for the first two tests 70-271 and
70-272 by going to ebay and downloading it for $3.20 LOL http://cgi.ebay.com/MCDST-Exam-Qs-As-Package-70-271-70-292_W0QQitemZ260346792933QQcmdZViewItemQQptZUS_Nonfiction_Book?hash=item260346792933&_trksid=p3286.c0.m14&_trkparms=72%3A1205%7C66%3A2%7C65%3A12%7C39%3A1%7C240%3A1318%7C301%3A1%7C293%3A1%7C294%3A50
Taxonomy and Meteadata Resources
http://hepburndata.blogspot.com/2006/12/metadata-defined.html
The following Metadata repositories exhibit these desired traits:
1. Whitemarsh's Metabase
2. CA's AllFusion Repository for Distributed Systems
3. Data Foundation's OneData Registry
4. Oracle's
Make an HTML apostrophe show up
In the HMR footer I added this to make the apostrophe show up in all browsers correctly:
’
Dell Server Build plus RAID and windows server
With NO OS (Windows Install instructions):
High level:
- First time out of box, accept EULA and Dell service tag
- Follow Dell steps for server with no os:
1. Insert the Dell Systems Management Tools and Documentation DVD
2. Press any key on the keyboard
3. The boot menu screen displays
4. Select Dell Systems Build and Update Utility
5. From the Dell Systems Build and Update Utility Home page, click Server OS Installation to continue your operating system setup.
- Make RAID 5 if possible
- Make 20-40GB C partition for OS install
- Make Swap Partition S twice the physical RAM or 8GB minimum
- Make Data Partition
Run updates
Install .NET Framework 2.0
Install Apps like - Sharepoint Server Standard Edition 2007 (will prompt for additional .NET Frameworks like 3.0 and maybe 3.5) or other apps
Website Banner Ad standards and sizes
This group runs all the standards - here are the sizes:
Good Linux find command and Joomla Footer
Here is the linux command I used and the file location in joomla to edit the footer:
From the public_html folder of the domain:
find ./ -type f -exec grep -H copyright '{}' +
The footer file you can edit to change the Joomla 1.5 standard footer is here:
/home/aheumann/domains/theheumannmarketreview.com/public_html/language/en-GB/en-GB.mod_footer.ini
Reset Root Password from console or root single user mode
So we have disabled root ssh to our linux boxes now. But to reset the root password we need to login as a approved ssh user (/etc/ssh/sshd_conf AllowUsers bacuff for example) then su root
Enter old root password
then passwd change to new root password
or - if you have no valid ssh users (bad but we foudn ourselves in this case today on our important shared web and mail server):
I'd first see if they can get in with the root pw first on the console, if that does not work, you would reboot, and when you get to the grub boot loader, you press e for edit, the second entry, you modify, and you put 'single' at the end of that line, then boot that up, it will drop you into root single user mode, and they can reset the password
Saturday, January 31, 2009
Some Yellowstone Pics!


Here are some pictures from out trip to Yellowstone last summer! Just now posting>!?!


Subscribe to:
Posts (Atom)

